
This is the whole point: artisan sourdough bread tutorial
How’s your starter looking? Bubbly and happy? Are you feeding it every day? Is it sour and pungent? Have you taken a little taste, and immediately screwed up your face because *wowser* that’s why they call it sourdough? Have you used it in anything yet? Are you starting to feel itchy because you haven’t done the real thing yet? The reason you started this sucker in the first place? HAVE YOU MADE BREAD? It’s time, friends. It’s proper, artisan, thick-crusted, chewy-as-all-get-out, big holey sourdough bread time.
I have explored several methods, read a bunch of different tutorials, and this is the one that works the absolute best for me. The end result is gorgeous, and exactly the reason I started making this bread in the first place. I tend to bake twice a week, two loaves each time. I give quite a bit away, but we get through a lot of bread in my house these days, and because of the beautiful crust, it keeps marvelously well. I usually toast by day three, but it isn’t really necessary until day four. I don’t ever buy bread any more, and I get horribly smug at the grocery store when I see someone going through the bread bins and buying a boule for $6 from a local bakery. You can make that, I want to whisper in their ear. Thankfully I have some self-restraint and content myself with a self-satisfied smile that probably makes me quite unlikeable. Worth it.
This method is (barely) adapted from the fantastic book Josey Baker Bread by a baker in California named, indeed, Josey Baker (I know). If you want to get serious about your bread-making, I’d recommend picking it up, at least on loan from the library, because he walks you through a marvelous set of tutorials particularly around artisan hearth loaves, and it helps you focus in on the different steps in turn. I find his tone to be a little California baker bro, but because the recipes and techniques are so fantastic, I kind of like it. He also includes an absolutely killer seasonal fruit crumble recipe among the other baked goods at the back. It’s the best crumble I’ve ever made. AND his brown butter chocolate chip cookies are bonkers delicious.
Because I always make two loaves at a time, this is the method for two loaves at a time. Sourdough bread takes time. It doesn’t take a whole lot of hands-on time, but it takes a lot of hours and a lot of patience, so I figure why bother making just one loaf. For the schedule that works for me, most of the work happens on Day 2. Day 1 is just a few minutes, and Day 3 is just baking. Here’s a pretty typical schedule:
| Day 1, evening | Make pre-ferment. 5 minutes. |
| Day 2, morning | Mix the dough. |
| Day 2, morning - midday | Fold the dough. |
| Day 2, afternoon | Bulk rise. |
| Day 2, late afternoon | Shape loaves. Rise overnight in fridge. |
| Day 3, morning | Bake! |
See what I mean? Even on Day 2, you’re really only handling your dough for a total of like 10 minutes. The rest of the time, it’s just waiting around for the magic to happen. I’ve found the schedule to be pretty flexible, but as I’m home most days, this is what works for me. You need a 2 1/2 – 3 hour slot to do the folding procedure (though you can be a bit flexible with this), and you should be around to check on your bulk rise, especially the first few times or when the weather is really different.
Making this beautiful bread does not require a ton of equipment, but you need a few things. You’re in luck, because I’ve made a post on just this topic, so head over there, and then come back here with your gear (or some semblance of your gear) assembled.
You also need to make sure you have all the ingredients you’ll need. Gather together: whole wheat flour, all purpose flour, vital wheat gluten, and salt. Oh, and water. I’d recommend reading through the whole procedure first, and figuring out how to make it work with your schedule.
Remember, this tutorial is having you mix enough to make TWO loaves – if you only want one, halve the recipe.
Ready? Let’s go.
Day 1: Make the pre-ferment (levain)
On Day 1, try to remember to feed your starter in the morning. This isn’t absolutely necessary, but you should have a healthy, thriving starter to work with. If you’ve had her in the fridge for a while, give her a few days/feedings to recover, and then she should be ready to go.
In the evening of Day 1, mix your pre-ferment. The pre-ferment (there are a ton of names for this, levain, poolish, biga, etc.) is the yeasty basis of the bread. It might blow your mind how little of your starter you actually use. 30g is like 2 tablespoons. That’s it! (And that’s why you need all these other uses for your starter.) You’re kind of making a new baby starter every time you start a new batch of bread, except you’re using whole wheat flour, which the wild yeast LOVE. That’s the pre-ferment.
| sourdough starter | 30g |
| cool water | 240g |
| whole wheat flour | 210g |
Mix the starter, water, and whole wheat flour together in your large mixing bowl. I use a rubber spatula, and really mix it up well. Once it’s mixed, cover the bowl (I just use a dinner plate as a lid for my bowl) and leave it on your counter overnight. It’s a blessing how quick this step is, because when you remember at 10:30PM after you’ve brushed your teeth that you want bread in two days, it’s literally three minutes to pull it together. In cold weather, I usually try to remember to mix up the pre-ferment right after dinner, so it’s ready for action earlier the next day. In summer, it doesn’t matter how late I mix it!
Day 2: Mix the dough
In the morning on Day 2, your pre-ferment should be bubbly and larger and smoother than it was the night before. You should see some big bubbles. The yeast is so busy. This is really key: make sure your pre-ferment is ready for action. You can test it by dropping like half a teaspoon of the mixture in a glass of water. Does it float? If it floats, you are now ready to mix in the rest of the dough ingredients. If it doesn’t, it’s not ready; be patient! Let it sit and check again in an hour; repeat until it floats.
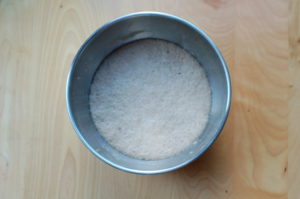
| lukewarm water | 480g |
| vital wheat gluten | 30g |
| all-purpose flour | 720g |
| salt | 24g |
If you have bread flour on hand, you can go ahead and use 750g of that in place of the vital wheat gluten and all-purpose flour. I absolutely do not have the cabinet space or patience to store both all-purpose and bread flour, and I need all-purpose flour for all the other purposes. Instead of bread flour – which Josey calls for – I use all-purpose, and I add my own gluten to the mix. It makes a huge difference in the rise as compared to when I use just all-purpose without the additional gluten. I buy Bob’s Red Mill Vital Wheat Gluten and store it in my freezer in a big mason jar. You should be able to purchase it in most well-stocked grocers. You may need to play with the quantity of gluten, as different flours will have different gluten content. I use an organic, unbleached all-purpose flour that comes in ten-pound bags at Costco; it’s milled by Central Milling Company and I’ll be quite distraught if they stop carrying it. If I run out and need to make bread, I’ll use Bob’s Red Mill’s unbleached all-purpose flour in a pinch and it works well, too, though I find needs a bit more gluten added to get the rise I like.
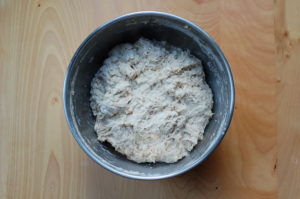
Combine the above ingredients right in with your pre-ferment. I use my hand at this stage to mix it all together. It will look a bit lumpy and raggedy, but don’t fret. The magic will happen over the next two and a half hours. Cover the mixing bowl and set aside.
Now, here’s where things get a little weather dependent. I live in Seattle, where it is soggy, humid, and cool 9 months of the year. I deplore central heating, so my house is usually somewhere between 65-68°F in those non-summer months. Cool temperatures can really slow things down.
If you have tried this before and are frustrated with a very slow rise, you can try the microwave-as-bread-proofer trick. [To be honest, I think the problem leading to a super slow rise is usually that you didn’t let the pre-ferment get active enough, not that the ambient temperature is too cold; a lesson learned from personal experience. In fact I am so confident in this that I got rid of my microwave because I didn’t need it any more]. For the microwave trick: heat a small microwave-safe jar or glass of water in your microwave for a minute. Leaving the jar of water in there, put your covered bowl into the warm microwave and close the door. Don’t turn it on! Just let the sealed microwave act as your proofing box. If you want to slow things down a bit, you can also save the microwave-as-bread-proofer trick for just the bulk rise (not the folding part) – as described below. You can also try switching on the light in your oven and using your oven as a proofing box, but from experience, I find that sometimes gets too hot! Your oven may have a proofing setting, but with sourdough, you want it on the lowest setting allowed so you don’t kill the yeast.
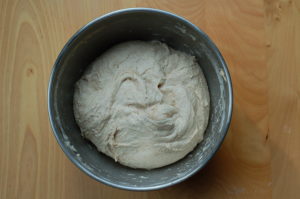
Day 2: fold the dough and bulk rise
Anywhere from 30 to 90 minutes after that initial mix, begin folding the dough every half hour.
What is this folding of the dough? Uncover your bowl. Wash your hands, but just shake them dry, don’t actually dry them; the wetness will help keep the dough from sticking. Use your dominant hand to reach under your pile of dough, and grab a gentle hold of some dough. Pull it up and over the top of the dough pile without tearing any of it. Rotate the bowl slightly and do this again. Repeat ten times (I like to count aloud), rotating the bowl as you go. You should have folded all the dough by the time you complete your ten folds. That’s it! Re-cover your bowl. Return it to the microwave if you’re using it.
Wait thirty minutes. Do it again.
Wait thirty minutes. Do it again.
Wait thirty minutes. Do it again.
Wait thirty minutes. Do it again.
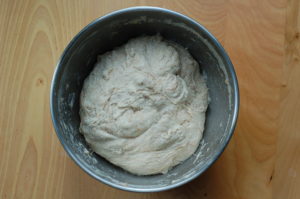
Yep. You want to fold your dough five times – this will take a total of two and a half hours if you wait thirty minutes each time. It’s not strict; sometimes I let an hour pass in between two folds, sometimes only twenty minutes at the end if I’m trying to get out the door, but you’re aiming for five folds, about 30 minutes apart. And I tell you what: it is AMAZING. The difference in the dough between the scraggy, messy start, and the smooth, delightful substance at the end is magic.
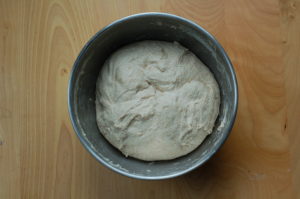
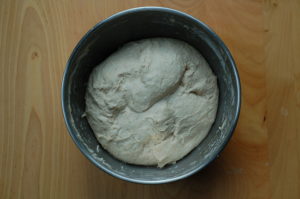
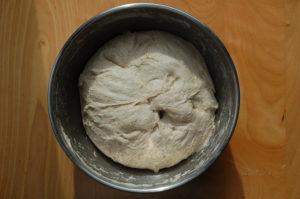
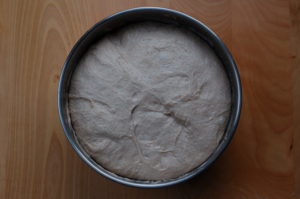
The next step is the bulk rise. If you are using the microwave (sometimes you may use it throughout the folding process, sometimes this is the first time), heat the water for another minute, then put the bowl of covered dough in there and close the door. Anywhere between 3-6 hours later, take a peek. How much has it risen? You want it to rise to about 150% of the original size. If your house is cold, and you don’t use the microwave trick, this could take a real long time – 8, 10, 12 hours, maybe longer. I’ve been known to leave it out overnight, but that almost always results in an exploded bowl of overproofed dough the next morning. If your house is hot and humid, it could be much shorter. Occasionally on a hot, humid summer day it will basically finish its bulk rise during the folding period.
This will take some practice and some judgment on your part. You can let it go too long, which is a sad sad truth: you’ll end up with overproofed bread, which is flat and dull and a grave disappointment. But as long as it’s not spilling over the sides and you’re keeping an eye on it, you’ll be fine.
Day 2: Shape those loaves
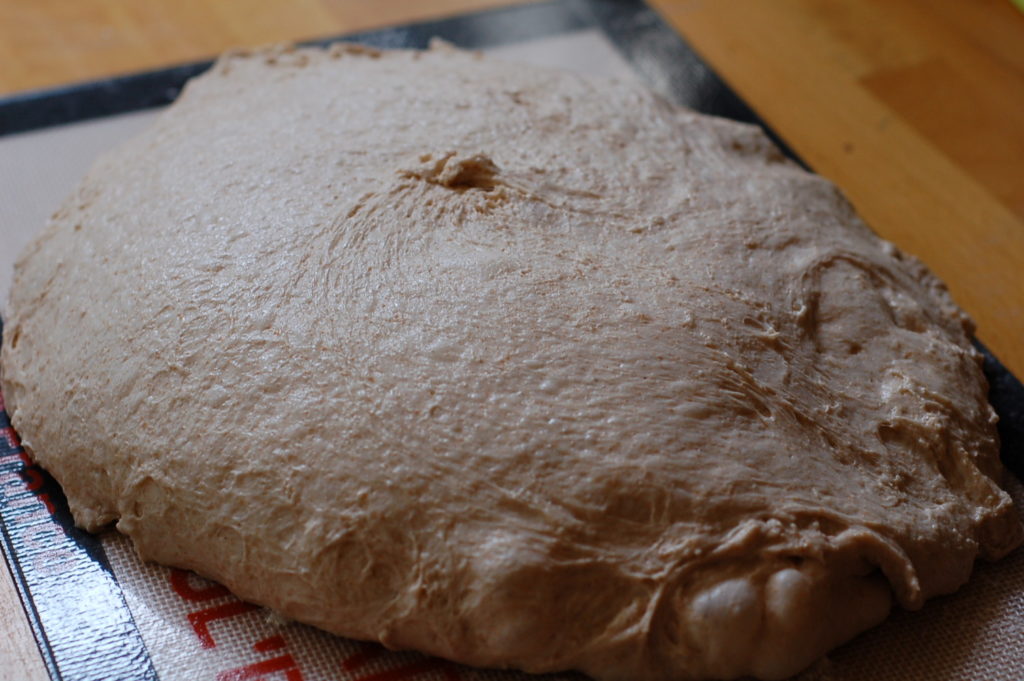
When your bread has risen to about 150% of its original size, you need to go about shaping your loaves. Dump your gorgeous dough out gently onto your well-floured surface and sigh with delight at the glorious bubbles all over it. It should be pretty gloppy and wet, but smooth.
Use your bench scraper to divide the dough into two approximately equal sizes. Using a technique kind of like the folding earlier, you want shape each piece into an approximation of a ball. I first sprinkle some flour on top of the dough and then gently work my way around each piece, pulling the dough from under onto the top. Then use your bench scraper to flip the ball over. It should be taut on top. Use your hands or scraper to kind of pull the ball around a few times – you want the ball to feel fairly tight, but you don’t want to pop all the gorgeous bubbles. This is definitely more of an art than a science – and it makes more sense once you are actually doing it.
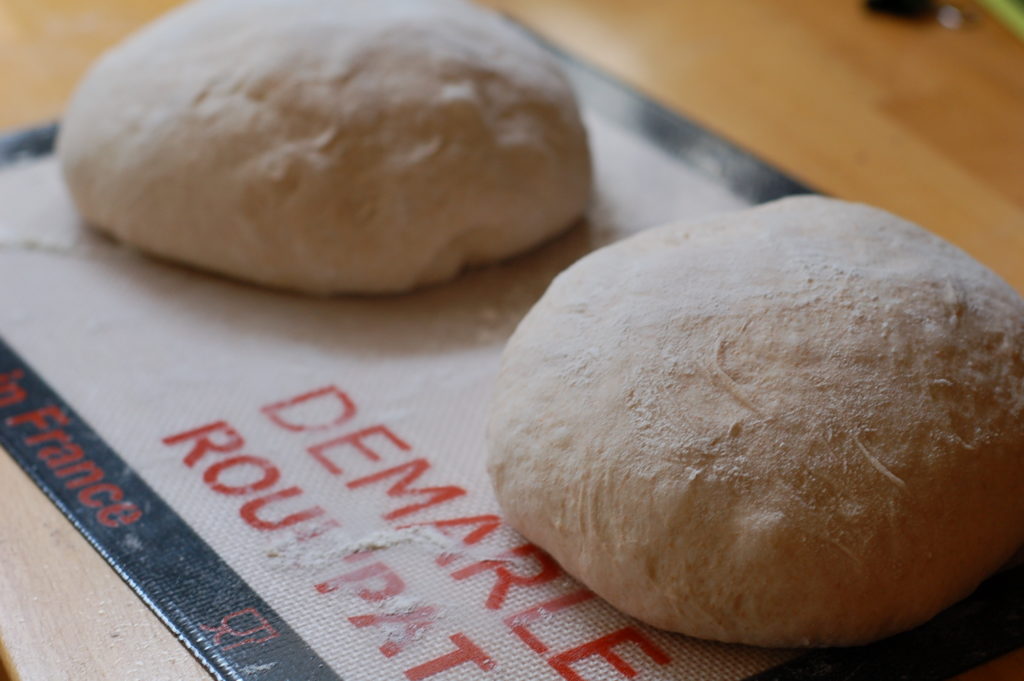
Once you have made your two dough balls, leave them alone for about 10 minutes. Now you’re going to do the final shaping and put them to bed in their baskets.
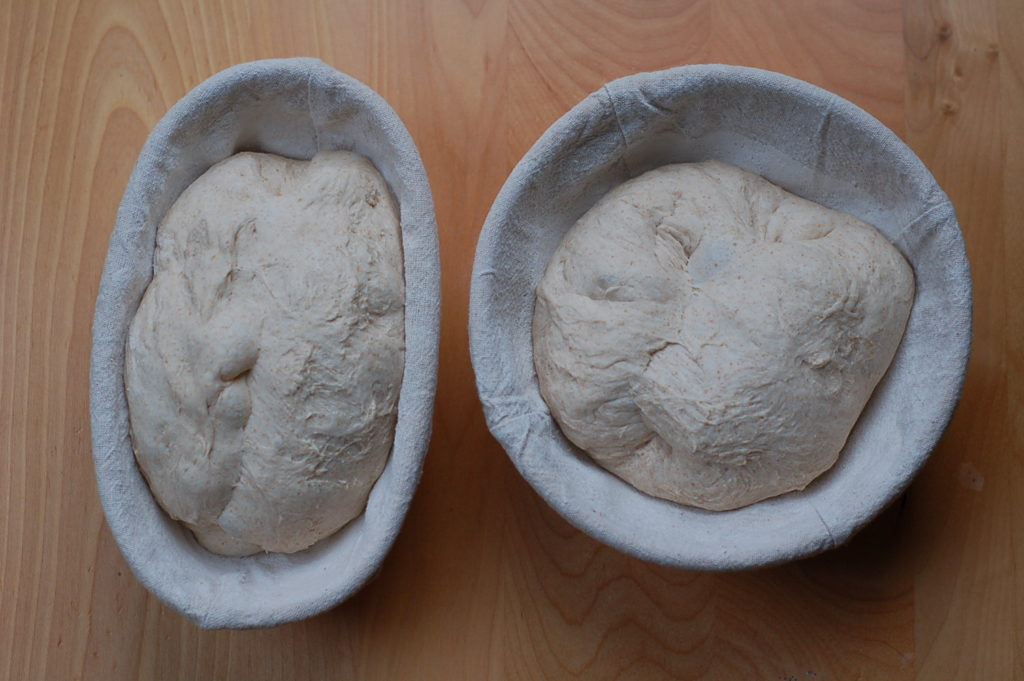
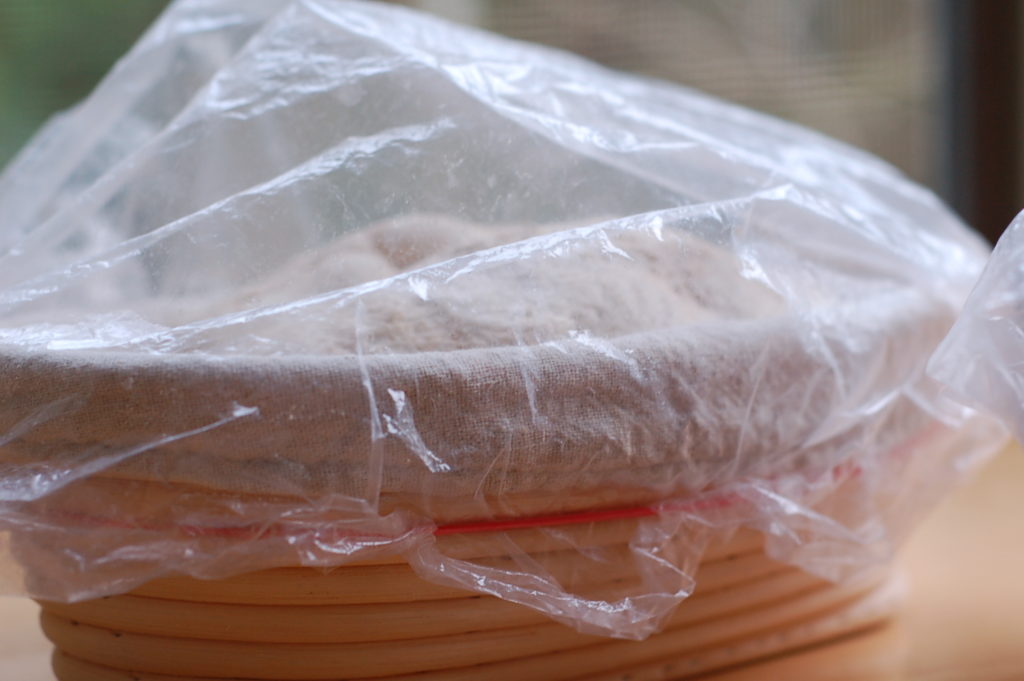
Are your baskets (or colanders, or bowls) prepped? You can line them with linen or tightly woven cotton cloth (some dish towels work well) that you have rubbed vigorously and extensively with rice flour. This is a wet dough, and it’s going to be sitting in these baskets overnight, so you really need to make sure the cloth is absolutely coated with rice flour to avoid sticking. Rice flour is so soft and fine, it’s quite pleasant to work it into the fabric. Alternatively, you can line your proofing vessel with parchment paper.
Now to shape the loaves. Again, this is more art than science. I sort of use the method Josey Baker outlines and it works for me; I’ve also watched a few videos online to try to get a good sense of it. Take one of your balls, and use your scraper to flip it over. Catch hold of the part further away from you, and lift it up, letting the rest of the ball sort of hang down towards the counter. Not too rough! You don’t want the dough to tear, just to stretch. I sometimes give it a little bit of a gentle shake. Now, imagine your dough as a letter than you are going to tri-fold to put into an envelope. Gently fold the part you are holding toward yourself (and toward the middle of the dough). Then catch the part that is closest to you and fold that away from yourself (and toward the middle of the dough). Now you have a sort of rectangular shape. Turn this 90 degrees, and gently – but firmly – roll the rectangle up. Use your fingers to create a seal where the roll stops, and don’t forget to seal the sides as well. The seal won’t be particularly firm, but do your best. Swiftly transfer your little roll of adorableness into your proofing basket (with the seal side up – this will become the bottom of your loaf) and repeat with the other one. Cover and find room in your overstuffed refrigerator to put these guys to bed for the night.
Your work today is done! Phew.
Day 3: Bake those suckers (and let them cool)
When you get up and are getting excited, put your baking vessels (with their lids) into your oven and start the preheating. My oven takes FOREVER to heat up, so I quite literally start preheating an hour before I want to bake. Set your oven to 475°F/240°C. You may not need a full hour, but you want that oven HOT and you want your baking vessels HOT. Incidentally, you also want to make sure you have very excellent heat protection – for both you and your counters – because you are going to be pulling those very hot vessels out and putting your dough into them and you do not want any burns anywhere.
Get out your cornmeal and your lame/serrated knife. Make sure you have enough room/heat protection on your counter so that you are able to have both vessels and their lids out.
When your oven and vessels are at temperature, pull your loaves out of the fridge. They won’t look that different from the night before – maybe a little bigger, a little smoother. That’s fine. Take the covers off. Sprinkle each with about a tablespoon of cornmeal. Are you ready? It’s happening.
Now, you want to do this part quickly, so you don’t lose heat.
Carefully pull out and open one of your baking vessels. Set the lid aside safely.
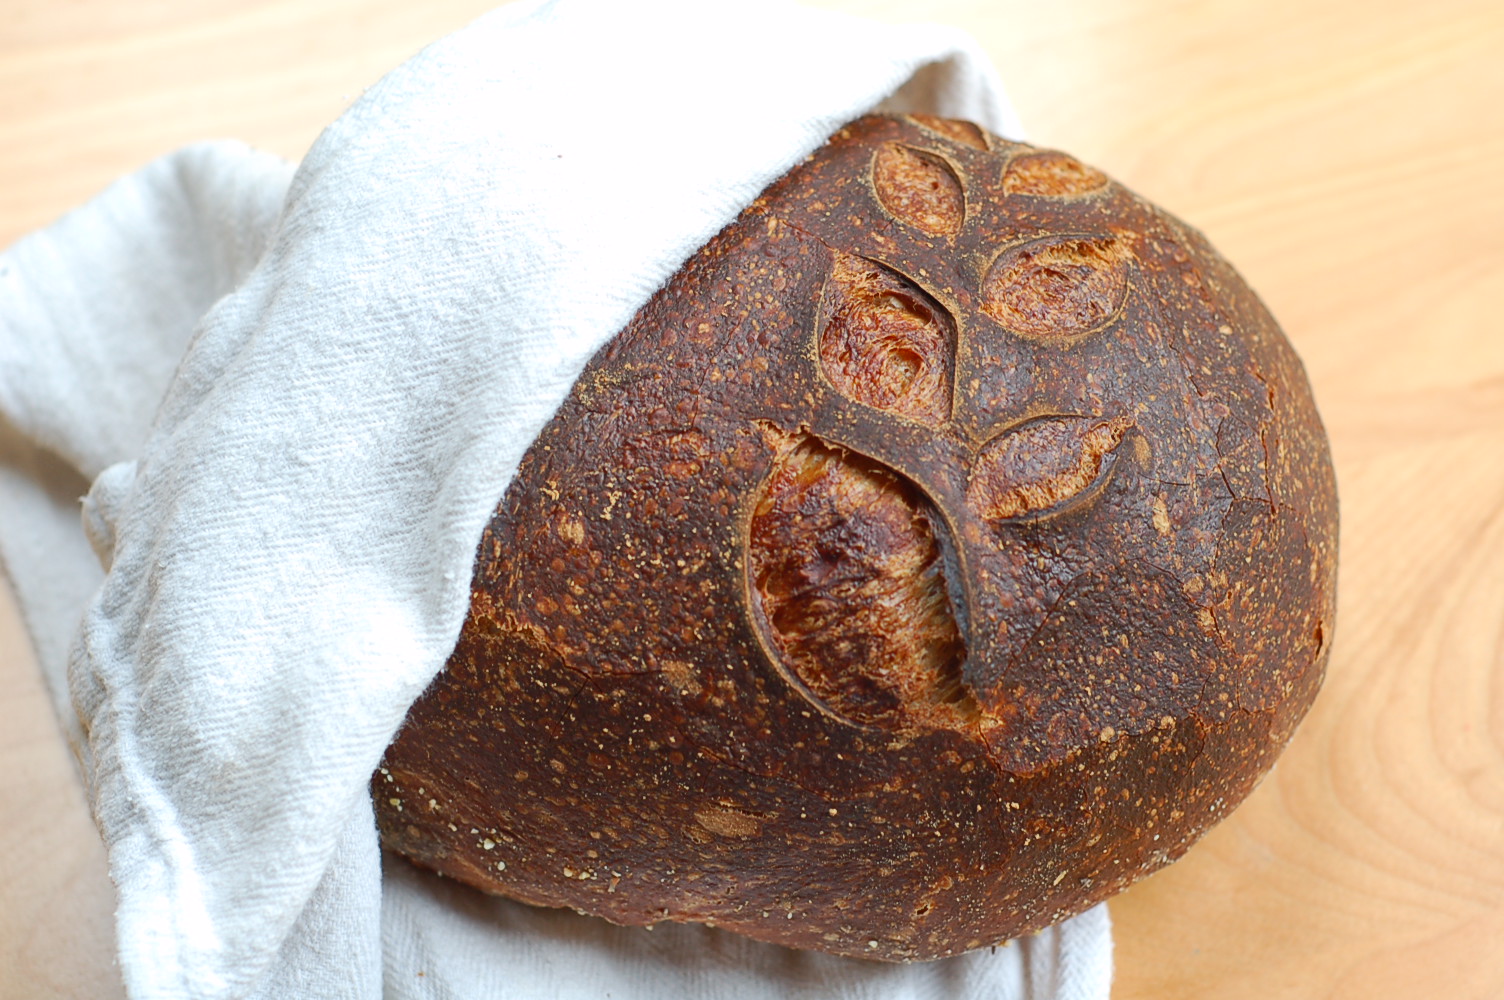
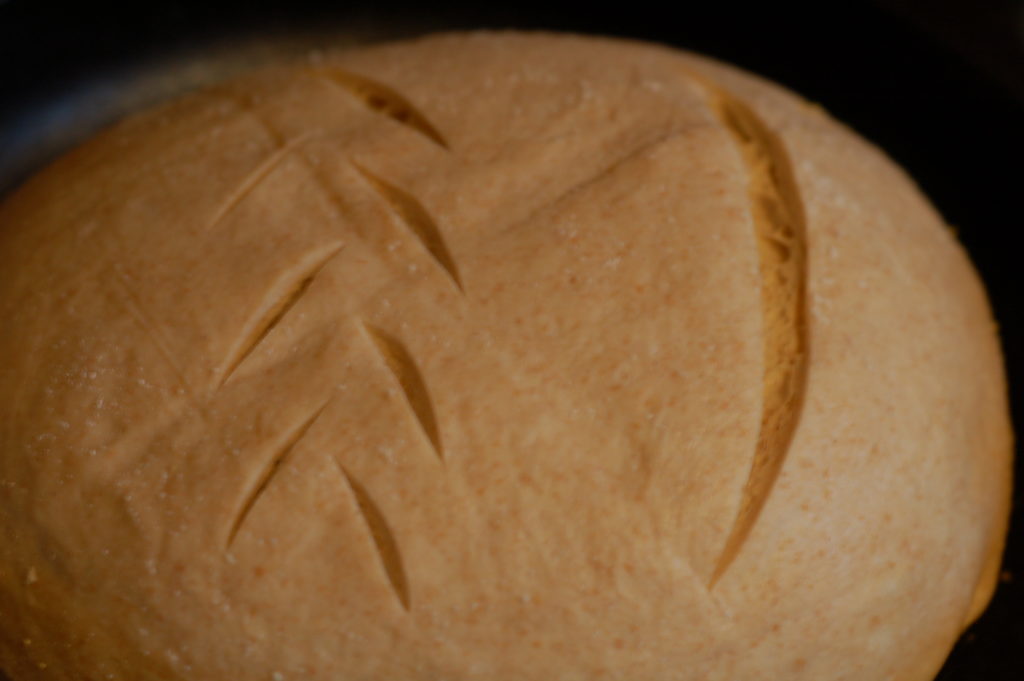
Pick up one of your proofing baskets and move to your kitchen sink. Place your hand over the top of the dough in the basket and flip the basket over, with your loaf coming out in a smooth motion into your hand. Doesn’t it look pretty? Carefully – oh so carefully, please be careful – place it as gently as you can without burning yourself into the vessel. Grab your lame and score your bread.
What is this scoring? You want to make a shallow, long cut in your bread loaf. You can start with one firm length-wise cut. Do it fast, without hesitation. You can play with fancier stuff when you get more comfortable. Instagram is an awesome place to find videos of people scoring bread.
Once it’s scored, replace the lid and pop into the oven. Working quickly, repeat with the other loaf. Set the timer for twenty minutes. By the end of those twenty minutes, you’re going to know your bread is baking because it will smell like heaven.
THIS IS THE BEST PART (other than eating). When the timer goes off, open the oven and carefully (yes – it’s all very hot, and I really don’t want anyone to get injured, please if you have children, barricade them from the oven when all of this is going on) remove both of the lids, setting them carefully aside. TA DA! Hopefully when you take the lids off, you see gorgeous golden loaves that are much bigger than what you put in. They should look like (underbaked) proper bread! Close the oven (quickly, don’t let all the heat escape while you admire your bread), and set the timer for twenty more minutes. When it goes off, it’s your call. You can let them go a little longer if you like it darker – a “bold bake”. But don’t let it go over the edge into burned.
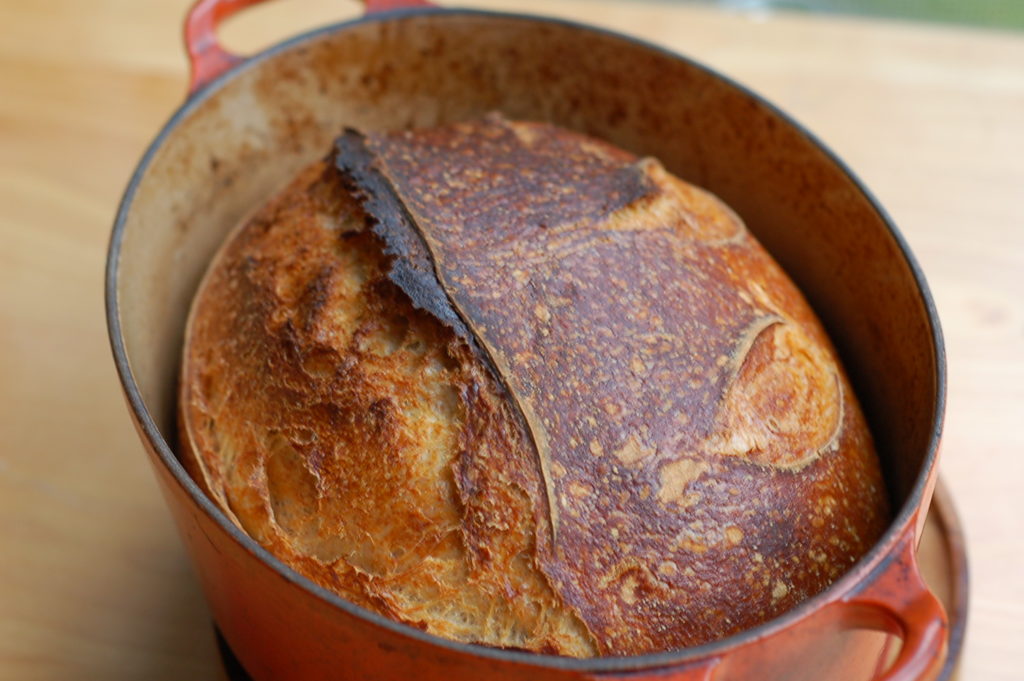
Pull out your vessels – with great care! – and tip the loaves onto a wire rack to cool. Now the most challenging part of the whole operation. You have to wait. When bread is hot out of the oven, it is still baking. It’s not done yet. Patience, pet. You really want to wait until it is fully cooled, else if you cut into it, it will be gummy and not at its full potential. So wait. Wait until it feels cool when you pick it up and hold your hand against the bottom. It’s absolute torture, but it’s worth it.
Then? Eat. Eat. Eat.
I’m going to do it! Valuable rising hints. Queenstown Tasmania weather is like Seattle!